Generally, Flower Pot easel cards are created by cutting a flower pot shape from card stock and securing it to the front section of an easel card. Although I've used the same general technique, instead of cutting a flower pot shape, I've used a pre-coloured digital image of a flower pot from the new set "A Little Something".
1. I started by opening the images and a sentiment in MSWord, a simple program that's familiar to most people. I set the pot height to 13/4", which will be the height of my "easel", and resized the flowers so they fit nicely with the pot. As you can see below, I also printed an extra pot and flower image at the same size, which will be used to add a little dimension to the finished card.
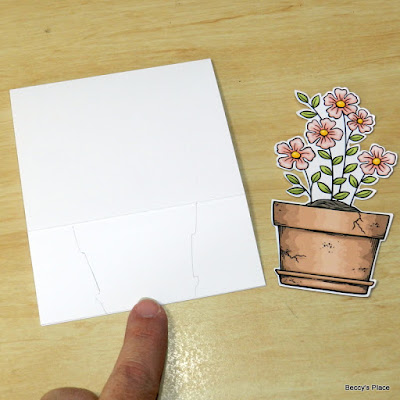
2. Fussy cut around the main flower pot image. Measure the height of your pot, which will be the first score line you make on your card blank. Mine is 13/4".
3. To create the card base, trim a piece of card stock to 10" x 4", place horizontally on your score board and score at the position that aligns with the height of your pot. In my case, that is 13/4". Make a second score line at 5". Fold along both score lines, pressing firmly with a bone folder to form the card base.
4. Line up your pot with the centre of the card. The top of the pot should align with the first score line you made. Use a pencil to trace along the edges of the pot, starting at the score line and stopping at the bottom edge of the card.
5. The lines you drew are to guide your cutting. There's no need to follow the lines exactly, just cut away the excess making sure your pot fits over the remaining card stock with nothing showing on either side.
6. Add patterned paper to the inside of the card and create an "anchor" with either a sentiment popped up on foam tape, which is what I did, or with a dimensional embellishment. You'll need something that the easel section of the card can lean against.
7. Secure the flower pot to the easel with glue or strong double sided tape.
8. Now embellish as desired. I used sections of the second set of images to add some dimension to the pot and also to embellish around the sentiment. I added more patterned paper to the top section of the card that is visible when the card is closed.
Stamps:


Wow Beccy, this is such a fabulous technique - you seem to come up with so many brilliant ideas. I love it!!
ReplyDeleteHugs, Jennifer.
Wow, Beccy what a lovely card. Than =k you for the inspiration and tutorial.
ReplyDeleteHi Beccy this is a gorgeous card. It is just so sweet. I love it. Take care. Hugs Jackie
ReplyDeleteIt’s always nice to share a layout this is lovely x
ReplyDeleteGreat that tutorial Beccy. Love the card shape.
ReplyDeleteKarin
Xxx
What a fun tutorial, Beccy! Love your card. So pretty and unique!
ReplyDeleteThis is a stellar idea that I'll be CASEing soon! TFS
ReplyDeleteOh i like this and the card is awesome...thanks for the technique Beccy.
ReplyDeleteWhat a novel idea for an easel card, Beccy! I am smitten, and completely plan to do something similar when I'm back to crafting. I love it! Thank you for always sharing the bestest of ideas! huggers, de
ReplyDeleteReally lovely card Beccy.
ReplyDeleteFaith x
I want to do this one. Hopefully soon. Thank you.
ReplyDeleteLove this technique and will have to try it. First have to get the stamp set. Hope the postage isn't to much to U.S.A. Like the pots and flowers set.
ReplyDeleteStunning Beccy. xx
ReplyDeleteJust could NOT resist this set, just received and it's gorgeous. x
ReplyDeleteLove it, thanks! xoxo
ReplyDelete