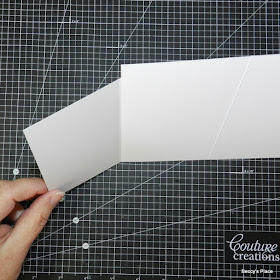
I have a fantastic card to share with you today, and it's one of my favourite kinds, with lots of bang for your buck! The card is basically a concertina with different heights for the different sections, and it can stand open to display the centre panels. With lots of surface area for sentiments and signatures, it's perfect for group gatherings and big parties... and it's pretty simple to make.
1. To make the base of the card you'll need one piece of card stock measuring 31/2" wide x 41/2" tall, one piece measuring 71/2" x 5" and one piece measuring 4" x 51/2".
2. Place the 31/2" x 41/2" piece of card stock vertically on your score board and score at 3". This will leave you with a 1/2" tab down the right hand side. Fold along the score line.
3. Place the 71/2" x 5" piece of card stock horizontally on your score board. Double check that it is horizontal (long sides at top and bottom) before you score. Score at 31/2" and again at 7". Fold along the score lines.
4. Apply glue or double sided tape along the 1/2" tab you created on the 31/2" x 41/2" piece of card stock, leaving the score line clear of adhesive.
5. Secure the 31/2" x 41/2" piece of card stock on the back, left side of the 71/2" x 5" piece of card stock, keeping the bottom edges flush.
6. Now we're going to repeat the process by adhering the 71/2" x 5" piece of card stock to the back, left side of the 4" x 51/2" piece of card stock to form one long card base. Apply glue or double sided tape on the 1/2" tab and secure.
7. Your card base should look like the photo below...
...and when folded:
8. To decorate, cut coordinating card stock and patterned paper to fit each section. You'll need two panels for the front of the card, two for the centre and one for the back. Add stamps or embellishments as desired, remembering to keep anything bulky at the front so that your card will fold flat.
9. Secure the panels in place with double sided tape or glue... and you're done!
Products:


Thank you for the lovely tutorial Beccy! It's on my to do list now :)
ReplyDeleteMust give this a try!
ReplyDeleteWhat a brilliant idea!! You have made such a great card there. Thanks for sharing the know how....just transferred to my 'to do' list.
ReplyDeleteWhat a brilliant idea!! You have made such a great card there. Thanks for sharing the know how....just transferred to my 'to do' list.
ReplyDeleteLooks like a fun card to do! Thank you.
ReplyDeleteAbsolutely fabulous card!
ReplyDeleteThank you for the tutorial :)
I love your photo tutorials! Will need to try this fold in the near future. It is absolutely gorgeous with that set (which is now on my with list!)
ReplyDeleteThank you love your card.
ReplyDeleteThank you for the tutorial!! Would be nice to get so many presents :)
ReplyDeleteBeccy, thanks for the tutorial. I just made one of these and posted it on my blog. Then I got to thinking... why is it called a four fold card when there are only 3 folds? Hugs, Debi
ReplyDelete