Thursday, June 28

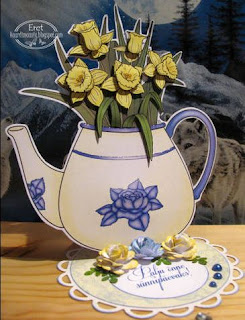
Daffodils in a Teapot

The weather here has been very cold and rainy for the last few days so these daffodils are perfect for cheering things up!  This image reminds me of my dear old Nanna who passed away many years ago.  She really, really loved her pot of tea in the afternoon and would always make sure there were plenty of cakes, scones and bickies to go with it!


Vivien coloured her flowers and teapot in a lovely soft shade of pink, then cut it out with a die.  She matched it with some lovely patterened paper and a simple sentiment.


Eret used the image itself to make this absolutely stunning easel card!  The teapot is held open by the little blue and yellow roses added to the bottom part of the card.
Thanks for a wonderful month of inspiration Eret!


I cut out the image and mounted it on a circle of card.  I added some pretty patterned paper, which I shaped with a border punch, some ribbon and a few drops of Liquid Pearls.

Tuesday, June 26

Time for a Freebie!

Here's a simple little drawing that could be used for a variety of occasions.  I really like these sorts of images because you can colour them to the taste of the recipient or a particular theme.


Don't forget that our June challenge is ending in just a few days.  It's a nice simple one... just make a card using any one of the Beccy's Place images.  I will choose a guest designer for the month of July from amongst the entries and the challenge winner, chosen at random, will receive three free images from my online store.
Good luck!

Monday, June 25

Potted Daffodils

After a brief stint with some lovely textiles, I'm back to flowers again!  Like many card makers, I really enjoy working with pretty flowers and I love to colour them in, especially since there are now so many different mediums on the market for paper crafters. 


Eret has used just the daffodil blossoms on her beautiful card.
She has layered them slightly to form a small bouquet.


Viv's gorgeous design uses the whole image.
She has coloured the pots with lots of light to give them a rounded appearance.


I printed two images so I could layer the pots and the blossoms with a little bit of foam tape.  The base image was embossed through the Cuttlebug.
(Sentiment by Stamping Up)

Thursday, June 21

Quilt Puddings Set

I know it is very early yet, but I just couldn't resist designing a Christmas image for this series.  Puddings, quilts, Christmas... all my favourite things in one place!


Viv's card


Eret's Card

Beccy's Card
(word stamps by Stamping Up)

Beccy's Card

Monday, June 18

Quilt Stars Set

It's another quilt for the collection!  This time it's one for the boys... although you could colour it in lovely soft pastels for a baby, or pretty brights for a girl.  It comes in a set of four black and white line drawings plus one coloured image.


Vivien's beautiful card done in soft shades of lavender and blue.

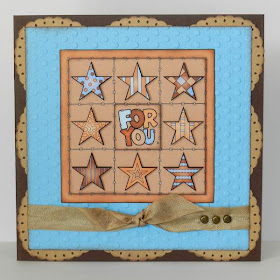
Eret's card has a slightly western feel to it.

Beccy's card was designed with a boy in mind.

Thursday, June 14

Quilt Hearts Set

It's no secret by now that I love quilts in all their different shapes and sizes.  And given that I don't have the patience to actually sew a real quilt, I get my fix by designing quilty images that look lovely on cards and scrapbook pages.
Today's design is all about love.  The set contains one coloured image (as shown below) plus four black and white line drawings.  It's available in store now.


Eret's beautiful card.

Viv's gorgeous creations...

and the card I put together.

Saturday, June 9

Thursday, June 7

Hydrangea

Hydrangea flowers always make me think of my grandparents, and old lace, vintage photos, and that wonderful musty smell you encounter when you walk into an old bookstore that has wooden floors.  They are lovely olde world flowers that look spectacular in the garden, and come in such a beautiful range of colours and even variations in the shape of individual flowers.  Oh, and they also make gorgeous cards!


Viv's beautiful card...

... and a matching bookmark.

Eret's gorgeous creation.

Beccy's Card

Wednesday, June 6

Technique Class - Colouring Digital Images

Colouring printed digital images is one technique that seems to generate a lot of questions and causes a great deal of frustration.  The printer ink bleeds or fades altogether, the paper pills or it ends up all buckled and difficult to work with!  Grrrrrr... it's frustrating just writing about it!
Today I want to show you an easy and inexpensive trick for keeping your ink in place - heat setting.  And just to make it interesting we'll do a comparison of a couple of different methods.
Before we really get going, I would like to point out that the type of ink you use in your printer as well as the type of paper you print on will have an impact on the results you get.  Try to buy the best quality ink for your machine that you can afford as well as the best type of paper for the colouring method you want to use*.


HEAT GUN
Heat guns produce a stream of very hot air, topping out at around 400C / 750F.  In paper crafting we generally use them to melt enamel and embossing powders or to dry inks and paint.

The downside to using a heat gun is that it tends to leave the paper warped, more so if you are heating a large area.


HOT DRY IRON
Another method is to use an iron, but make sure you turn off the steam setting first.  (Who knew there would actually be a useful purpose for an iron!?)


The downside to using an iron is that it's relatively easy to scorch the paper, as you can see in the image below.  It will leave a yellow cast to the paper... brown or black if you leave it longer!!

COLOURING
I coloured three of the images with copic markers - one image with no heat setting, one image heat-set with a heat tool and the third image heat-set with the iron.  Have a look at the differences between the following pictures...


Notice how the image with no heat setting has a slightly muddy look to it, particularly in the pink of the flowers.  The second image, set with the heat gun, has much less of a muddy appearance, but it is still obvious that the ink has run.  The best result, in my opinion, is from the hot, dry iron.


DISTRESS INKS
I repeated the same process again but coloured the images with distress inks.  Interestingly, this colouring method did not seem to cause the printer ink to run as easily as it did when using the alcohol markers.  I assume this is because the blending process with the markers is a lot more involved, giving the printer ink a lot more opportunity to bleed.


It's a good idea to compare different papers, colouring methods and inks until you are satisfied with your results... and who knows, maybe irons will make a comeback!


* I have an Epson ink jet printer and only use Epson brand ink.  The cardstock I used for today's tutorial is Whisper White by Stampin' Up.  I am not affiliated with either company.

Monday, June 4

Roses and Pears


This month the lovely Eret will be joining us as a guest designer.  Stop by her blog and get to know her a little and also take a look at all the beautiful work she does, it's very inspiring!

Eret's Card

Vivien's Card
Viv has some great free background paper available on her blog!

Beccy's Card

Sunday, June 3

A Freebie

Please pop over to Viv's blog for a lovely set of freebies that she's been working on!  Don't forget to leave her some love.

Friday, June 1

May Winner and Guest Designer

A hearty congratulations to our randomly chosen May challenge winner - Eret!  You've won three images of your choice from my online store.
Thank you to everyone else who has played along this month, I love seeing all your entries and I enjoy visiting your blogs.

I have had a good look at all the wonderful cards submitted for the May challenge and I have selected Eret as my guest designer for June!  It's a clean sweep for you this month Eret, congratulations!


Shabby Chic Birdhouse

There's something about birdhouses that really appeals to me, and judging by how popular they are in magazines and shops, I'm not the only one.  My husband's grandmother used to collect decorative birdhouses to distribute around her home... it always seemed so inviting and homey.


Available in store now.

Glenda's Card
I would like to extend a hearty thank you to Glenda, our designer for the month of May, for all her hard work and inspiring designs.  It's been a pleasure having you on the team Glenda and I know that people have enjoyed seeing your work.

Vivien's Card
Stop by Viv's blog in the next few days... I have it on very good authority that there might be a nice little something available to whoever visits!