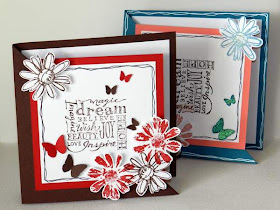
I know I have said it lots of times before, but my favourite cards are those that have a lot of WOW without all the hard work and I think these diagonal trifold cards fit the bill perfectly.
1. We'll be making a square card today so start with a piece of cardboard measuring 51/2" x 11". Score in the centre and fold.
2. With the card facing you, take the top right hand corner of the card front and fold it down to the bottom left corner as shown in the picture below. Press the fold firmly with a bone folder or scoring tool.
3. Adhere a contrasting piece of cardstock measuring 5" x 5" to the centre inside of the card. Alternatively, you could use a piece of patterned paper.
4. Adhere a 41/2" x 41/2" piece of cardstock to the front diagonal piece of cardstock, taking care to keep the adhesive only on the sections you are joining - be careful not to glue your card closed (says the voice of experience!)
5. Decorate a piece of cardstock measuring 4" x 4". You should use a design or image that can be viewed either vertically or horizontally as the front of the card will pivot when the card is opened. Notice how I have stamped my sentiment sideways on the right hand side. If you look at the card when it is opened (bottom picture) you will notice that the sentiment is now the right way up!


Beautiful card Beccy..Loz
ReplyDeleteThese look great Beccy, thanks for the tutorial too :) Viv xx
ReplyDeletethank you for the tutorial, pretty cards
ReplyDeletebeautiful card, wonderful tutorial, thanks!
ReplyDeleteWhat a great fold Beccy - simple but effective and, yes, it carries the WOW factor! Thanks for sharing. Helen x
ReplyDeleteThank you for showing and telling us how to make this card. Edwina Brown
ReplyDeleteUm, totally awesome and amazing! PINNED and will definitely be using this! THANK YOU FOR SHARING! :)
ReplyDeleteBeautiful card and a great tutorial for the tri-fold card!!
ReplyDeleteTFS this idea, it will come in very handy!
ReplyDeleteKeryn x
love the card see simple but complicated looking. Thanks.
ReplyDeleteLove this card, but I don't understand where you have to glue the front 4x4 piece. When I open my card, the front 4x4 remains on the front. I don't see it when i open the card. Any advice?
ReplyDeleteHi Edward3031. The 4" x 4" piece of card stock is added in step 5. It is adhered directly to the 4.5" x 4.5" piece that you placed in step 4, which becomes the mat for the smaller piece.
DeleteIf you have a close look at the photo in step 4, you will see the card is closed and the front has been folded diagonally on itself to make a triangle. A lighter piece of orange card stock has been glued to the diagonal piece. The 4" x 4" card stock is secured in the centre of that piece of card.
I hope that helps, but if not please feel free to send me an email at beccy@beccysplace.com and I'll try to help you out.
Cheers,
Beccy