At my card club recently we did a shoe box swap where we brought along card kits we had put together for the other members at our table. The idea was to pass the kits around so that everyone made a card from each person at the table, resulting in a nice little stash by the end of the day. I decided to make this double gatefold card using punches, butterflies and patterned papers.

Requirements:
A4 cardstock base (8 1/4" x 11 3/4")
Patterned paper 8" x 3 3/4"
Two strips of green patterned paper 8" x 2"
Small offcut of white cardstock
Vine punch (I used a Martha Stewart punch)
Lattice border punch (I used a Martha Stewart border punch)
Small flower punch (I used an EK success punch)
Self adhesive pearls (I used Kaisercraft pearls)
Paper butterflies (I used Collections Elements Creative Butterflies)
Sentiment stamp (I used Stamping Up Sincere Salutations)
Score board and score tool
Foam mat
Ink pad
Double sided tape
Small foam dots
Wet glue (I used Glossy Accents)
Glue pen (I used Zig Squeeze and Roll)
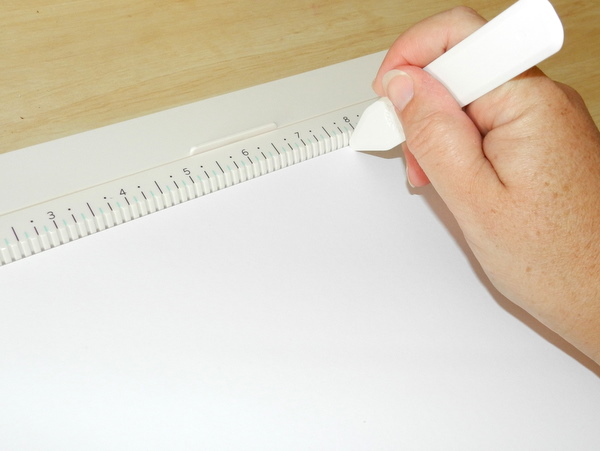
1. Use the score board and scoring tool to score the cardstock at 1 7/8", 3 7/8", 7 7/8" and 9 7/8". Fold the card in the following way, from left to right: mountain fold, valley fold, valley fold, mountain fold. Open the card back out.

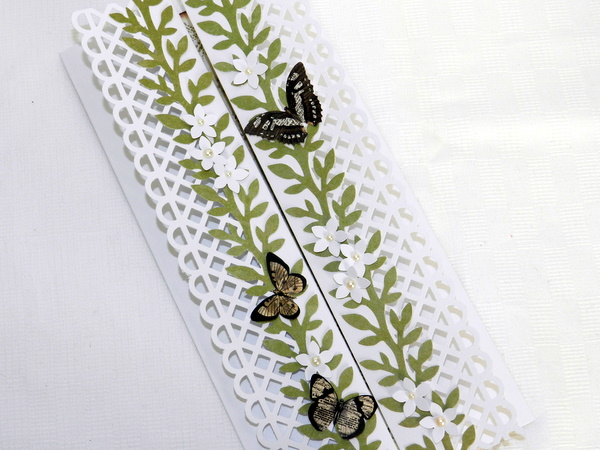
2. Use the border punch to punch a decorative edge down both short sides of the cardstock.

3. Use the vine punch to punch two vine strips from the green paper.

4. Put glue on the back of the stems of the vine (don't worry about adding any glue to the leaves), and adhere the vines as close as possible to the punched edges of the card.

5. Ink the edges of the 8" x 3 3/4" piece of patterned paper and adhere it to the centre panel of the card - you will have a little border around all four edges.

6. Stamp a little sentiment on the bottom of the panel to the right of the centre panel.

7. Punch 10 - 12 little flowers from the scrap of white cardstock.

8. Place the flowers on the foam mat and shape each by pushing a stylus down firmly in the centre of the flower until the petals fold upward.

9. Use wet glue to adhere the flowers to the vine. It is best to group them randomly and offset the two sides so that when the card is closed the flowers aren't all in one place. Add a pearl to the centre of each flower.

10. Cut out two or three butterflies. If you don't have printed butterflies you could stamp and colour some in or download some of the free digis or clip art from the internet.

11. Apply a couple of foam dots on the back of each butterfly wing. Add some wet glue down the centre of each body.

12. Press the butterflies on to the vine in various places. The body should be flush with the card while the wings will be raised by the foam dots.


Fold the whole thing back together and you're done! The card should fit nicely into a standard DL sized envelope or you could get super creative and make your own.


Absolutely BEAUTIFUL!
ReplyDeleteGreat card Beccy!
ReplyDeleteBeccy
ReplyDeleteThis is great.
Thanks for giving me some more ideas. Hope you don't mind if use your idea.
Myrna
This card is Lovely, I just Love it! Carol
ReplyDeleteLovely card.
ReplyDeleteBeautiful card and I enjoyed the tutorial. Thank you.
ReplyDeletebeautiful card beccy also the shape of the card.
ReplyDeletegreetings karin
Beautiful card, love it!
ReplyDeleteSmukt kort og tak for de gode ideer.
ReplyDeletekh
Beccy, I love this card! I used your measurements for scoring and it isn't coming out right. :(
ReplyDeleteOh dear, I'm so sorry Judi, I just double checked and saw that I left out one of the measurements. You need to score and fold at 3 7/8" as well. I will ammend the instructions now. Thank you for letting me know about the problem and I apologise for the error.
ReplyDeleteCheers,
Beccy
This is a beautiful card! I might have to try one out! Someone on the Operation Write Home facebook page mentioned your free digis and I thought I'd check them out.
ReplyDeleteThanks for all your hard work creating them!
Beautiful gatefold card, love it!
ReplyDeleteAbsoulutely beautiful card
ReplyDeleteWonderful card I am going to try this in some kind of Christmas design. Thanks for the tutorial.
ReplyDeleteThis is such a lovely card...and thanks for the wonderful tutorial.
ReplyDeleteThanks Beccy!
ReplyDeleteThis is very pretty, thanks for sharing the tut.
ReplyDeleteThis is a very nice card... Love the composition and all the elements you added.
ReplyDeleteI have the same punch and I don´t use it to much but you just gave me a good idea in how to use it, I like the little flowers you made.
Hi Beccy!
ReplyDeleteI like so mucho your beautiful card! I add this on my post today.
-Sony
Wonderful tutorial, thank you!
ReplyDeleteAnother gorgeous card and great tutorial...thank you.
ReplyDeleteThis is fabulous! Thank you.
ReplyDeleteLinda
This is absolutely beautiful. Thanks so much.
ReplyDelete