Selected, retired digital stamps at an incredibly low price for just 48 hours.
▼
Thursday, October 31
Wednesday, October 30
Celebrations
"Celebrations" is one of my favourite sets as it covers almost every occasion during the year. Birthdays, Christmas, Valentine's Day, engagements, baby showers, weddings... every event where gifts are given or exchanged! That makes it great value for money. To add to the useability of the Celebrations stamps and dies, we're introducing Celebrations cut sheets as well as our very first patterned paper pack!
Tuesday, October 29
Sunday, October 27
Happiest Holidays
Judy created a fabulous, traditional-style Christmas card using patterned papers in rich reds, greens and yellows, which perfectly compliment the image of dear old Santa from the new Nicholas Claus set of digital stamps. She embellished with a fun twine and button combo that perfectly hold the sentiment tag in place.
Saturday, October 26
Country Christmas
Pencils on kraft cardstock always looks great, and also works well with country themed images. I added a length of twine and a wood-look button to complete my country style card.
Products:
Friday, October 25
Wishing You Joy
Cynthia has used kraft cardstock to give a farmhouse feel to her Country Christmas projects. It works well with just about every colour, including this beautiful, rich purple. Cynthia also used some white to add highlights and contrasting flecks to her cards.
Wednesday, October 23
Merriest Christmas
I kept things simple today with a no-line colouring image of dear old Santa painting a cute little duck, some embossed panels and a happy sentiment.
Products:
Tuesday, October 22
Inside-Out Christmas
The Inside-Out Christmas stamps contain sentiments for both the inside and the outside of your cards, which can be mixed and matched depending on your needs. The die set contains cutting dies for the large sentiments plus a long, flag die for the medium words. (As a bonus, the flag die also works with the medium sentiments from the Inside-Out Birthday stamps. There's nothing like coordination!)
Ask for us by name at your favourite scrapbook shop!
Monday, October 21
Merriest Christmas
Check out these two rosy-cheeked Santa cards that Anesha created using the new Nicholas Claus set of digital stamps. After colouring the images with markers, she added some highlights with white gel pen to give a beautiful high shine.
Saturday, October 19
Deck The Halls
While colouring the gift image from the new Country Christmas set, I added some additional lines to the lid to create a checked pattern. I then cut the image with a circle die before layering it over some embossed cardstock and decorating with small gold branches.
Products:
Thursday, October 17
Tutorial - Santa By The Fire
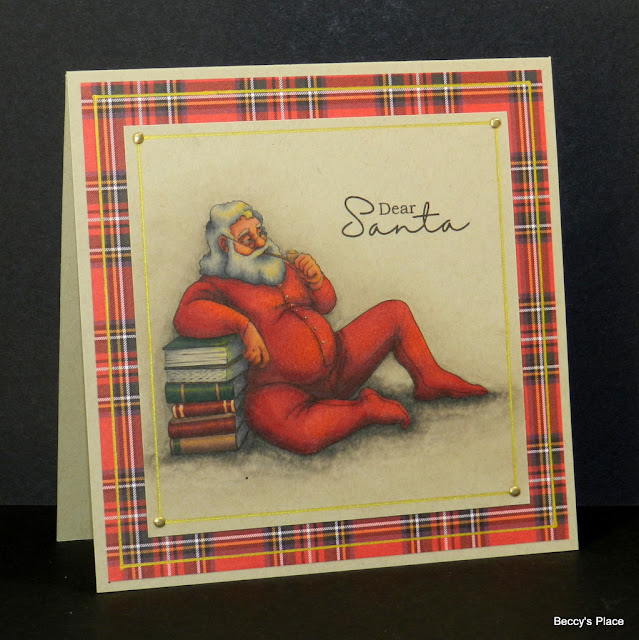
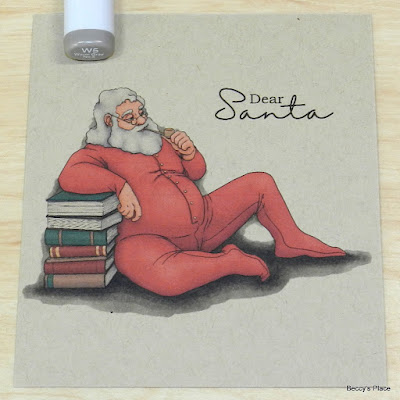
My oldest son designed this beautiful image of Santa relaxing with a big stack of books. When I saw it, I knew I wanted to give the impression that he was sitting in front of a cosy fireplace, which meant I needed to add deep shadows to contrast with the warm glow of the flames. Let me show what I did...
1. Print the coloured image onto a piece of kraft cardstock and select a range of warm grey markers for the shadows beneath and around the image. I'm using copic markers - W8 down to W0 and a clear 0 for blending.
2. Add the darkest marker under Santa's body, feet and the book stack, then progressively shade the colour out using lighter and lighter greys.
3. When I got to the W6, I started to add shadows higher up on the image - under his raised knee, under his elbow and between his arm and the top of the book stack. Continue shading out the greys until you've reached W0.
4. Use the 0 blending marker to soften the outer edge of the shadow and blend it into the paper. If you wish, you can break up the dark shadow underneath the image with the 0 marker to add more texture.
5. I chose RV99, R89, R59, R37, and R29 to colour Santa's long johns. Place the RV99 in all the areas where the light doesn't reach, then use the remainder of the reds to shade out the colour, leaving the highest areas, such as his belly, chest, top of the legs, until last. They will be coloured with the lightest shade of red. These will also be the areas where you focus the "glow" of the flames.
6. For Santa's face and hands, I used E18, E17, E15, E13, and E11. The darkest areas will be around his eyes, beside his nose, in his ears, between and behind the hands. The lightest places will be along his nose and forehead, the apples of his cheeks, and the tops of his hands.
7. I used cool greys for his hair and beard, starting with C7 and working down to a C1. Remember that the darkest areas will face away from the light or be behind things that cast a shadow, such as his ears and nose.
8. I coloured and shaded the books with reds, greens, greys and the E series I used for his skin. Remember to add nice deep shadows for contrast.
9. To add a glow, I'm using a very warm yellow with a touch of light yellow for the highlights. The glow will be on all the high areas that are facing the fire, such as his nose, forehead, the front of his hair and beard, his legs and arms. Don't forget to add a little hint of yellow to the ends of the books.
Products:


