Anesha combined the little pig image from the Barnyard Birthdays set with some fun backgrounds to decorate this fabulous notebook. To complete the project, she also added some borders with white gel pen and a fine-line black marker.
▼
Monday, September 30
Saturday, September 28
Gorgeous Florals
These two beautiful cards were created by Anesha, using the Timeless Florals set of digital stamps, coloured with alcohol markers. Take a look at the gorgeous combination of colours she has used on those hydrangeas!
Thursday, September 26
Tuesday, September 24
This Little Pig
Sunday, September 22
Tutorial - Quarter Fold Cards
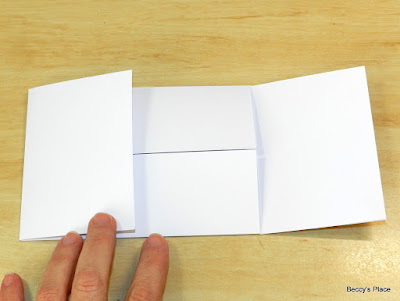
Quarter fold cards are created from a single sheet of cardstock, and have four sections that fold inward over the centre. Each panel can be filled with decorations, sentiments, or personalised messages, so they're particularly handy for big parties or groups.
TEMPLATE:
(NOTE: I generally create my tutorials in inches, but today I'm using an A4 sheet of cardstock and therefore will provide the measurements in centimetres. For those who use different sized cardstock, the idea is the same. Each side panel is a quarter of the measurement of the entire cardstock. For example, if the cardstock is 12" wide, then the right and left side panels will each be 3" wide. If the cardstock is 8" long, then the top and bottom panels will be 2".)
1. Place your A4 sheet of cardstock horizontally on your scoreboard and score at 7.4cm and 22.2cm. Rotate the cardstock 90 degrees so that it is vertical on your scoreboard, and score at 5.25cm and 15.75cm. (Refer to the template if required). Fold along the score lines.
2. Use a craft knife or trimmer to remove the four corner sections.
3. As the panels have to fold up, you'll need to remove about a millimetre more from either side of the top and bottom panel. (see photos below)
4. Use a corner rounder to cut off the square corners. This will help prevent creases and bent cardstock.
5. Time to decorate! You'll need four pieces of cardstock measuring 10cm x 7cm, and four pieces of cardstock measuring 14.2cm x 4.8cm. Trim the corners on one side only. Use glue or double sided tape to secure them to the back and front of each panel.
6. Trim four pieces of patterned paper to 9.6cm x 6.6cm and four pieces of patterned paper to 13.8cm x 4.4cm. Again, round two corners on each piece to match the card base. Secure over the cardstock with glue or double sided tape.
7. Decorate the front panels with images and a sentiment or, if you prefer, create a belly band to hold the card closed. I used a couple of the chooks from the Hey Chick set of stamps, a birthday sentiment, and a few drops of black Nuvo enamel.
8. I decorated the inside of the card with fluffy little chicks and another sentiment.
Products:
Friday, September 20
Uh Oh!
Ever felt like this at the approach of a birthday?
To create the thought bubble, I cut out the sentiment with a large oval punch, then added two little circles cut with different sized hole punches for the "bubbles".
Digital Stamps:
Wednesday, September 18
Timeless Elegance
Carla has coloured both images from the Timeless Florals set of digital stamps to create these two beautiful cards. She combined each image with coordinating paper and cardstock for an elegant effect.
Monday, September 16
Saturday, September 14
Farm Friends
Anesha has two fun cards to share today, featuring images from the new Barnyard Birthdays set of digital stamps.
Thursday, September 12
For A Fabulous Friend
I chose muted pinks, violets and greens to colour the tulips from the Timeless Florals set of digital stamps, then fussy cut, and popped it up against a piece of black glitter cardstock.
Digital Stamps:
Tuesday, September 10
All Those Candles?!
It seems like an innocent question, but there's a whole lotta subtext coming from this sassy equine!
Digital Stamps:
Sunday, September 8
Paper Piecing
Karin has paper pieced part of the image from the Timeless Florals set of digital stamps to create the first of her two cards. She used the same patterned paper for her background and for the milk jug containing the pretty tulips.
For her second card, she fussy cut an extra hydrangea flower and layered it over the base image to give even more depth and dimension.
Friday, September 6
Interactive Fun
Carla has created two fun, interactive cards using the new Barnyard Birthdays set of digital stamps. Her first card features the little pig, coloured with pencils, sitting beside a piggy bank with a secret birthday message. While her second card has a set of barn doors that open to reveal a somewhat surprised looking horse. Cute!!


