Friday, July 30

Encore Set - Seasonal Windows


We're playing with one of our old favourites this month - the Seasonal Windows set. It's a digital set that features one window through the four seasons of the year along with a collection of mix and match sentiments. Anesha, Judy and Karin have created some wonderful new projects to inspire you to bring out this wonderful old set.

Seasonal Windows
digital stamps

Thursday, July 29


Selected, retired digital stamps at an incredibly low price for just 48 hours.
No rainchecks. No repeats.

Ellie
digital stamps

Tuesday, July 27

You're A Treat

I love the look on this little bear's face, it looks as though she's been caught in the act of doing something she shouldn't... like eating all the berries on the bush! 


Stamps:

Saturday, July 24

A Lifetime of Love

A simple wedding card created with two merged images from the new Happy Couple set of digital stamps. I opened both images in MSWord, pushed them together and printed them in colour. After fussy cutting the bride and groom, I layered them on a piece of embossed card stock surrounded by a fancy die cut oval.


Stamps:

Thursday, July 22

A Lifetime of Love


This beautiful card was created by Anesha using the Happy Couple set of digital stamps. She has kept the colour scheme almost neutral with whites and gold for a truly elegant look.


Head over to Anesha's personal blog for more inspiration:
Anesha's Blog

Tuesday, July 20

Delicious Icecream

"Eat More Icecream"
What more do I need to say?


Stamps:

Sunday, July 18

Karin's Creations


Today, Karin is sharing two pretty wedding cards that she created with the new Happy Couple set of digital stamps. Both cards feature lots of elegant paper as well as lovely embellishments and pastel coloured card stocks.


For more of Karin's work, visit her personal blog:

Friday, July 16

Judy's Wedding Cards


These beautiful cards were created by Judy, using the new Happy Couple set of digital stamps. She has included some elegant die cuts, little pearls and glitter paper to embellish her gorgeous projects.


You can find more of Judy's work on her personal blog:

Wednesday, July 14

Everything Papercraft - Pergamano

Pergamano, also known as parchment craft, is the art of decorating vellum or parchment paper with tools and paper craft techniques. Some of the most common methods include perforating, colouring and embossing to create intricate patterns, borders and images. Historians believe the craft originated in Europe during the 15th or 16th century and was predominantly used to decorate religious items such as communion cards and devotional pictures.

Pergamano artists use a variety of tools including white pencils to trace designs onto the parchment, embossing tools to add shape and colour, specially designed snips and scissors, and needle tools that perforate the paper resulting in lace-like patterns. Some needle tools have multiple points for creating specific types of patterns.

Once the patterns have been embossed, perforated and clipped, many artists further enhance the design by adding colour with mediums including pencils, ink, acrylic paint, and markers. It’s very common for finished designs to then be mounted onto greeting cards, but there are also artists who frame their work or create beautiful 3D projects.


Carla created these two beautiful projects using Pergamano techniques.

Monday, July 12

Anesha's Little Bears


Anesha has been busy creating some fantastic cards with the new Beary Delicious set of digital stamps. She has coloured each of the images and matched them with one of the sentiments from the set. Each card has then been finished with die cuts, hand-inked borders, or other embellishments.


For more of Anesha's work, check out her personal blog:

Saturday, July 10

Tutorial - W-Fold Cards


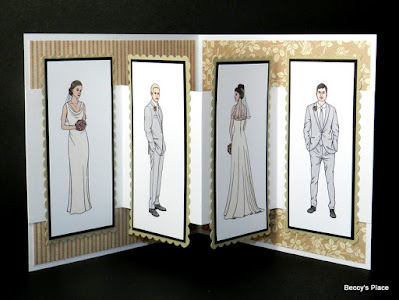
W-Fold cards may just be my new favourites... they're easy and fun to make and can be resized to fit whatever images you wish to use. And let's not forget how fabulous they look when standing up on display. They are perfect for showcasing multiple images, photos, sentiments or a combination of everything. 

TEMPLATE

1. To create a card the same size as mine, you'll need one piece of cardstock measuring 10" x 5" for the base, and one piece measuring 10" x 3" for the inside panel. (If you'd like to make your card in a different size, just keep in mind that the panel needs to be the same width as the base card. The panel is divided into four equal portions, and each portion needs to be large enough to hold the image with room to spare on both sides.)


2. Score the card base at 5" and fold in half. Place the inside panel horizontally on your scoreboard and score at 21/2", 5" and 71/2", fold along each score line starting with a valley fold, then a mountain fold and finishing with a valley fold. The panel will resemble a "W" when sitting on your desk.


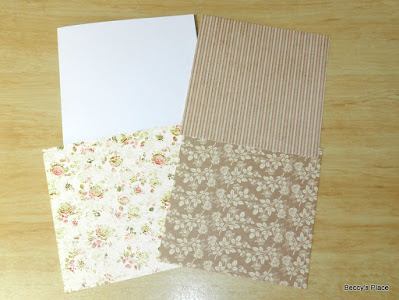
3. Trim three pieces of patterned paper to 43/4" square. Adhere one to the front of the card and the other two to the inside.


4. Add glue or double sided tape to the back of the first section of the panel (between the left-hand edge and the first score line). Secure the panel to the inside of the card, centred between the top and bottom edge and flush with the left-hand edge of the card. See the photo below.


5. Fold the panel until you expose the last section. Apply glue or double sided tape to the entire section and then close the card to secure the panel in place.


6. To decorate, prepare your images or sentiments on individual pieces of cardstock. I have layered three pieces to create my panels, with the finished size being 2" x 4". You must ensure that each of the images fit, width-wise, onto the sections of the panel with room to spare. In my case, my images are 1/2" narrower than the sections of the panel. For the best results, you want them to be longer than the panel so that they extend beyond the top and bottom edge. In my case, my images extend 1" beyond the top and bottom.


7. Use glue or double-sided tape to secure each image to the inside panel, taking care to apply the adhesive only where the image meets the panel.


9. Decorate the front of your card and you're done!


Stamps:

Thursday, July 8

Hot Tip Tuesday


Reducing Your Stash II
Share With Friends
Reducing the volume of craft supplies stored in our cupboards, rooms or studios is a subject we all talk about regularly. Many of us spend hours sorting the items we've accumulated in order to make our work spaces more efficient, to declutter our homes and to find that "lost" item that would make the perfect finishing touch for a particular project.
A fun and simple way to help reduce your stash is to share items with friends - and not just the items you already have in your craft area but also new purchases. Think about the packets of embellishments that have more items than you'll ever use in a lifetime, such as sequins or seed beads. Perhaps they could be split between four or five people in your card making group or your local scrap class? How about organising a swap group that meets regularly to exchange items you may have in excess, which won't actually reduce the volume of what you have, but may mean you'll have less of one particular item. And if you happen to meet a person who is new to the craft, consider sharing your excess papers, stamps, markers and embellishments so you both reap the benefits.

Tuesday, July 6

Karin's Pop-Up Card


Karin has created a fun Free Standing Pop-Up Card using one of the little bears from the Beary Delicious set of digital stamps. She has cleverly altered the image in her photo-editing software to replace the berry branch with an ice-cream cone that one of the other little bears was holding. 


You can find more of Karin's work over on her personal blog: